• Home
    • Digital Photos
    • Print Photos
    • Media Conversion
  • About us
  • Happy Clients
  • Blog
  • Contact Us
Menu

Pictures in Place

Street Address
Oakville, ON
416.953.5972
Simple solutions for print and digital photos...

Your Custom Text Here

Pictures in Place

  • Home
  • Photo Organizing
    • Digital Photos
    • Print Photos
    • Media Conversion
  • About us
  • Happy Clients
  • Blog
  • Contact Us

Use the Notes App on your iPhone to save reference Photos

January 30, 2020 Patricia Keogh
Depositphotos_162224808_l-2015.jpg

Is this photo for your curated collection or reference?

Our iPhones are a tool that we use every day, taking a photo of something  as a reminder is now almost a daily occurrence. When we are shopping, items around the home, names of places we want to remember, a great restaurant  or book title we don’t want to forget.

Separate them out

It’s frustrating to have these photos that we took as a reference gets mixed in with our photos that are important to us, the ones we want to keep. We scroll up and down looking for that picture of the replacement furnace filter that we need to buy twice a year. Those reference photos are a great tool, but not so nice when they pop up in your “memories for you” function on your phone.

Use the tools we have

The notes app on your iPhone is a great tool available to allow you to separate the reference photos from our curated photo collection.

Interested? Stay tuned!

In the middle of a renovation and you find yourself taking lots of photos all of the pieces you need for your new kitchen or bathroom? Light fixtures, faucets, cabinet knobs and handles – you get it. We have so much choice available it can be very overwhelming; we take photos of our favourites.

Use the Notes App to take the photo!

Take the photo directly into the notes app or you can add one that is currently in your camera roll. Someone sends shares a photo with you, you can add that too!

Let’s take a look at how to do that.  You are in the hardware store and you would like to take a photo.

Open up the notes app and tap the camera, take a photo. You can take multiple photos and add any notes about your photo in the note! Everything in one spot, great for keeping all similar photos into one spot.

iPhone Notes 1.png

You can also add any picture from your Photos app so that you can clean up your photo library from all of those reference shots.

Let’s take a look

From your Photos all find the picture(s) that you would like to add to the notes. Add and text that you want to add and Select choose new note or you can add to any existing note on your phone.

iPhone Notes 2.png

Create Folders

Keep your notes organized by creating folders, keeping similar notes together for easy retrieval.

Some examples of how I use the notes app: Home reference notes, renovations, food, drink, restaurants, books, health.

About the Author:

Trish Keogh founder of Pictures in Place, the Photo Organizing Company. Please contact info@picturesinplace.ca to discuss your project.

January is Get Organized (GO) Month!

January 8, 2019 Patricia Keogh
Get Organized Photos.jpg

January is Get Organized (GO) month!

What projects do you want to accomplish this year? Do you have a photo project that has been on your mind but are feeling overwhelmed? Tackling your photos doesn’t have to be a daunting task. Here are a few tips to help you enjoy your photos and the memories that they bring us.

Make a plan

What do you want to accomplish? Here are some of the common projects:

  1. Gathering all of your digital photos from your multiple devices and create a digital photo hub. (Having all of your photos in one place)

  2. Sorting through those old prints photos and having them scanned and added to your digital collection.

  3. Creating a photo book highlighting the events of 2018.

  4. Having your VHS or Super8 films converted into digital format so that you can view them again.

Prioritize

Which project do you want to start first? Next, break the project down into smaller sections allowing you to accomplish smaller goals.

Allow yourself time

It will take time to complete you project, book yourself a block of time in our calendar on a regular basis.

Start with Today

I suggest starting with today and move backwards through the years. Working with your most recent pictures is easier as you will remember the details more clearly. Once you have 2018 cleaned up move backwards in time. It becomes simpler to piece the puzzle together.

Backup, Backup, Backup

Remember that a good back up is key. Three copies, on three different devices, in two separate locations. Don’t take the risk of losing all of your photos.

Celebrate your accomplishments

Don’t forget to celebrate the small successes along the way and remember to share the stories!

About the Author:

Trish Keogh founder of Pictures in Place, the Photo Organizing Company. Please contact info@picturesinplace.ca to discuss your project.


Tags #photoorganizing, #photobackupplan, #backingupphotos

Need a Graduation gift? A Top of the Class Solution!

March 12, 2018 Patricia Keogh
Graduation.jpg

Spring has almost sprung and and graduation season is just around the corner. Do you have a child that will be celebrating a graduation from elementary or high school, University or College in a few short months? It’s time to start thinking about how to mark that milestone event! Here are a few gift ideas to mark such an occasion.

Photo books are a wonderful personalized keepsake, here are a few ideas on how to set one up.

Your Life in Review

This is look back at the life and times of the graduate. You can use pictures that represent some highlights of your child’s life through the years.  School events, birthday parties, holidays, vacations, sports teams, performances or those everyday photos that bring a smile to your face. Scan some report cards, art work or a photograph of a project or favourite toy and add them into the book. Be sure to leave some space for some text for a special message to the graduate.

Graduation Day and Party book

This will require a little help from your friends. Gather photos from all of the graduation events; prom, the graduation ceremony and the after party. Create a small book to remember the special day.

If the preference is for a digital format rather that a book, you can create a slideshow.

Gather your photos and pair them with music for a retrospective review of their life.  It’s also easy to add a voiceover a message to the graduate. If you have any audio clips from their childhood, that would make a fun addition to the show.

What ever you decide, a personalized gift is very meaningful and is sure to be a hit! It will always be treasured by the recipient. Take some time to plan your project now,  whether you plan to do it yourself or get some help from a professional.

About the Author:

Trish Keogh founder of Pictures in Place, the Photo Organizing Company and a mother of a recent high school graduate. Please contact info@picturesinplace.ca to discuss your project.

Tags #photobooks, #photoorganizing, #graduationgifts

Storing Photos in your shoe boxes instead of shoes? Let’s get them sorted!

February 12, 2018 Patricia Keogh
shoebox of photos_9581368.jpg

We’ve all been there, finding that dusty old box in the basement - opening it up and finding a treasure trove of old photographs. These photos carry generations of memories that deserve to be protected and shared.

Let's get started!

You will need to gather all of your print photographs into one place, both the loose photos and those that are in albums.

Gather your tools

You will need lint free cotton gloves, small boxes to hold your sorted photographs, index cards - to act as temporary category separators, small stickies for notes, a microfibre cloth to wipe the photos down, photo safe pencil, un-du remover, waxed dental floss and a small spatula.  Set up a table that you can leave set up over the course of the project. Commit to a period of time, say one hour at a time and work one box, one album at a time.

Start with your loose photographs

Sort by decade, don’t get hung up on exact dates. Use the clues in the photos to make your best estimate of the time frame, such as clothing, age of people, time of year and location. Use your index cards to separate your photo categories as you sort, use your stickies to write notes. As you are sorting now is the time to get rid of duplicate copies, similar photos and fuzzy shots. Flag those that you would like to digitize for a photo book, or slideshow.

Let's tack the albums!

Sort them chronologically, review and mark the photos that you would like to keep and remove them. If your photos are in a magnetic album - the ones that have an adhesive and a thin plastic film, it is crucial that the photos are removed as they will cause your photos to deteriorate over time.  This is where your un-du remover, dental floss or spatula to loosen your photos from the page will come in handy - work slowly. As a last resort hair dryer on a very low temperature will help to loosen it.  Add these photos to your sorting boxes.  Now that you have completed your sort it is time to move your photos to a permanent box, choose a photo box that is acid free to keep your photos safe.  Many will have dividing cards in them that you can use. Create a label for each divider. You can create subcategories within each decade - birthday, holidays, vacations.

Digitizing your print photos

Scan those photos that you would like to digitize. When scanning photos you will want to create Digital Photo Hub (DPH) - the one place on your computer that all of your photos live, and nothing else gets mixed in with them. Create folders in your DPH that mirror your newly organized photobox.

Avoid storing your photos in an area with fluctuating humidity such as a basement, garage or attic. Avoid hot and cold temperature fluctuations and store in a dark location.   The top shelf in a bedroom closet is an ideal location that will guard against damage in the event of a flood.  

About the Author:

Trish Keogh founder of Pictures in Place, a Photo Organizing Company. Please contact info@picturesinplace.ca to discuss your project.

Get those photos back in your life, create a Year In Review Book!

January 16, 2018 Patricia Keogh
Photobooks.jpg

Simple steps to create a Year in Review Photo Book

Looking at family photographs on a screen doesn't have the same feeling as looking at photos in a tangible book. Do you remember flipping through photo albums? Do you find yourself feeling happy and nostalgic when you visit a loved one and looking at your childhood or family photo albums?

When we went digital we stopped printing photographs,  the photos sat on the computer rarely enjoyed and shared.  A number of years ago I decided that I would create a book for each year - a Year in Review album. As a family we love to travel and we take a lot of pictures when we are exploring new places. So every January my project is to create our Year in Review photo book and I’ll share my tips with you.

Share your Story

With your photographs, the places you went, the people that you met and the memories that you created.

Feeling overwhelmed?….break down the task

Here are some tips to help you with this project.

It may sound like a big task - but doing a little bit throughout the year will make it easier. Review your photographs every month as they come in, it’s much easier to review 4 weeks of photos rather than 52.  

●    Review
●    Rename, Rate and Tag
●    Utilize your software


Review your photos every month and decide which you will keep and delete the bad and multiple shots now!

Rename -  using the year-month-day-who-what-where naming convention will allow you to retain important information about your photographs. Your photographs will be ordered chronologically and you will have all of the information about the photograph, it’s hard to remember all of those details as time goes by! It’s like writing on the back of the photographs.

Rate and Tag your photos - most photo organizing software allows you to rate your photos, tag those shots that are special to you and that are worthy of being added into your book,  the rest can be kept as your backup photos. Use a consistent rating / tagging system through the year so that you can easily identify what will go into your photo book.

Utilize your software - Add those winning shots into a smart album or folder within your photo organizing software called “2016 Year in Review”. At the end of the year you will have a smaller collection of photos to choose from when it comes time to create your book.

Get your photos in the correct order

As this particular book is the year in review, your layout is likely chronological. Start in January and work your way through the year.
Add a little bit of text - a short paragraph outlining the highlights of the year. Travel, special events or visitors that were hosted.

Choose your Layout

There are many different options to choose from when creating a photo book to suit every budget. Hard cover, soft cover, small or large formats. Many provide templates, with preset themes into which you can simply drop your photos into an allocated spot.

My personal preference is to have a consistent look for all of my photo books, I choose a blank book and then pick my background colours and layouts.

Add Text

I encourage you to add text - a few words about where your were, who you were with, or what the celebration was. As time goes by the details become hard to remember, and if someone picks up your book - the key details are there for them to “read your story”.

Share your Memories

Now that your book is done it’s time to enjoy and share it. It’s easy to order an extra copy for a family member too.

Sounds like a great idea, but don’t know where to start?

It is normal to have this feeling, so many years to get through. My advise is to start with the most recent year and then tackle the previous years, one year at a time.

About the Author:

Trish Keogh founder of Pictures in Place, a Photo Organizing Company. Please contact info@picturesinplace.ca to discuss your project.

Tags #photobooks, #photoorganizing

Do you suffer from Photo Chaos?

October 10, 2017 Patricia Keogh
Pile of old photosWM.jpg

Do you have too many photographs to enjoy? Is it difficult to find photos to share with loved ones?  Do you get overwhelmed with the thought of sorting through your photographs? Do you have too many print photographs for your space? Are you photographs backed up and secure or are you concerned that your photographs could be lost?

We all have photographs whether they are print, digital or a combination of both.  They are often left in shoeboxes, overflowing albums, on computer hard drives, camera cards or cell phones. Many of us add to our photographs every day without any structure making it difficult to find images that we will want to keep and cherish.

Photo Organizers will consult with you to understand your specific needs and wants.  They can then help organize your photo library and ensure that your photographs are safe and secure.

They will compile your photographs, remove duplicates, blurry shots and find those special photographs worth keeping, so that you can enjoy and share your stories. A good backup system is a must for your photo library, as it ensures your photos are safeguarded.

Photo Organizers will create a personalized yet structured format relevant to how you will want to access your memories. This could be in chronological order, by event or location.

They will also give you the guidance and tools that you need to maintain those 'best practices' yourself.

Just a few of the ways to enjoy all of those great pictures and celebrate your memories are: creating a photo book, displaying a year in review, a special trip, an anniversary or an event. You can also create a gallery wall or a video slideshow that you can share with your family or friends.

Photographs can make us laugh and cry, they help us to share our stories, and let us celebrate our memories.  They can trigger memories often forgotten about. Organization will ensure that these memories are safely preserved.

About the Author:

Trish Keogh founder of Pictures in Place, a Photo Organizing Company. Please contact info@picturesinplace.ca to discuss your project.

Are you doing anything fun with your photos?

September 4, 2017 Patricia Keogh
Aisling and Allyson Photo Collage WM.jpg

Back to school is here and with it comes many mixed emotions. After a very enjoyable summer I am excited for the new school year to begin, as it always brings a resurgence of energy, but I am also a little anxious of the change it entails.

‘Have fun with your photos, they tell our stories’

Earlier this year, I was looking back through some old photos and came across this photo of my daughter and her friend. They both got a good kick out of seeing it, so I suggested that they have a little fun and recreate the photo. In the original photo they were about 2 years old. They met at daycare, located in our local high school and became good friends. Off to different elementary schools they went, and did not meet again until they were back at the same school, but this time as high school students. In June of this year, just before the graduated, they recreated the photo!

Photographs help us tell the stories of our lives, they transport us back in time for a few moments, so it’s important to share and enjoy them. Take some time and plan to get those photos of: the first day of school, halloween costumes, friends from the school or sports, holiday celebrations and silly faces.

‘Use your photos to make a special gift.’

Photobook on edge.jpg

This fall will be very different for our family, as our daughter is off to university. We are so proud of her and excited for this new chapter of her life to begin, but I am also feeling sad and a little nostalgic about wanting my little girl back.

As a parting gift for my daughter, I created a photo book. A collection of photos of her, her accomplishments, places that we have been and the fun that we have had along the way! Hopefully it will help her when she is feeling a little homesick.  I printed a second copy to help me, as we transition into this new stage of our lives.

‘Keep your photos organized, accessible and secure.’

It’s fun to reminisce over family photos, but the downside of digital is that we don’t print our photos any more. Take some time each month to keep your photos organized, accessible, and secure. If you do that it will take very little time to find your photos for that special gift.

About the Author:

Trish Keogh founder of Pictures in Place, a Photo Organizing Company. Please contact info@picturesinplace.ca to discuss your project.


Tags #saveyourphotos, #photobooks

September is International Save Your Photos Month. Do you have what it takes to save your photos?

September 1, 2017 Patricia Keogh
Box of loose photos b&w.jpg

Did you know that in 2015 over one trillion photos were taken? By 2017 approximately 80% of photos will be taken on a mobile phone.

How many photos are on your phone? Hundreds? Thousands? Do you go through them occasionally, periodically or not at all? As your photo library grows the task of maintaining it can become daunting. Plus there is the risk of loss due to theft or damaged devices. It’s not all doom and gloom though! Adopting good habits to edit, backup and tag regularly ensures that you can find, share and enjoy pictures easily. So how do you do that?

Let us share the ABC’S of Digital Photo Organizing.

A is for Album:
These are the best shots - the album worthy pictures. They are the photos that you like enough to print, display in a frame, add to a photobook and share with family and friends. You would be heartbroken if you lost them.


B is for Backup:
These are the shots that support the best. They may not be perfect but they still represent a moment in time, a trip, an event or a special person in your life.

C is for Can:
In this case C stands for garbage can. These are the duplicates, similar or fuzzy shots, places or people that don’t hold special memories - really bad photos. Don’t worry about letting go of these; you have the “A’s and the B’s” so you can get rid of the “C’s”. Plus they are taking up memory on your device.

S is for Story:
We take pictures to share our stories with family and friends. Any photo that makes you smile, laugh, cry, holds a special memory is an “S” worthy photo and should be kept.

S also stands for Save.

Now you have done your ABC’S and your library is a manageable size but remember to protect it by having it in more than one place. It is recommended that you have a 3-3-2 back up system - 3 copies of your library, on 3 different devices and in 2 separate locations.

We take photos to capture life’s moments; remember to share as them as well. There’s no time like September to practice the ABC’S of Photo Organizing!

About the Author:

Trish Keogh founder of Pictures in Place, a Photo Organizing Company. Please contact info@picturesinplace.ca to discuss your project.

Tags #saveyourphotos

Are your Digital Photos Safe?

August 8, 2017 Patricia Keogh
Computer Camera and EHD WM.jpg

The three things that people grab in case of a household fire or flood are people, pets and photos. Creating a Digital Photo Hub and reviewing your photo backup plan will ensure that your digital photos are safe and secure.

What is a Photo Hub and how do I create one?

A Digital Photo Hub (DPH) is the one place that all of your original photos are stored, ideally this should be on your computer or an external hard drive. It’s essential if you want to keep your photos organized and backed up! Once you have your DPH set up it’s where all of your original photos will live. 

Characteristics of a good DPH

It’s dedicated, high capacity, accessible all the time, and intentional - not random.

An example is a dedicated folder on your computer or a dedicated external hard drive.  Using your phone or online cloud solutions are NOT good places to store your original high resolution photographs. 

A Dedicated Hub

This means that you store nothing but your photos there. Mixing other files in with your photo hub will create clutter and disorganization. Keep it free of anything not related. Create a photos folder on your computer or an external hard drive and keep all other files out. It is a logical place, the first place that you will go to look for pictures. When you want to find a photo you will have one place to look.

Have enough storage capacity

Our photo libraries are constantly growing so you need to ensure that you have enough space to store your photos. You are intentionally creating a home for all of your photos so they are not scattered on different devices. Storage devices are inexpensive so go for a minimum of 1TB.

Keep your hub accessible

Make it local, your original photos should live where you do, they shouldn't live in the cloud. Cloud storage can be an option for a backup copy.

Your hub must be intentional

Plan carefully where you want to store your photographs, don’t take a chance with your memories.

Back them up!

It is recommended that you keep multiple copies of your digital library. We recommend the 3-3-2 back up plan. 3 copies of your library on 3 different devices and in 2 separate locations.  This ensures that your memories are safe guarded in case of a hard drive crash, flood or fire.

Start your new year by creating your dedicated Digital Photo Hub and reviewing your photo backup plan, you’ll be glad that you did.

About the Author:

Trish Keogh founder of Pictures in Place, a Photo Organizing Company. Please contact info@picturesinplace.ca to discuss your project.

Tags #photoorganizing, #backingupphotos, #photobackupplan
1 Comment

Do you need to reduce your digital volume? A how-to guide for using the delete button!

July 5, 2017 Patricia Keogh

With the advent of digital photography, and by extension the improved quality of the camera on cell phones, we are taking more photographs than ever before. We take photos with great abandonment and spontaneity! On my own phone, I have shots ranging from collision damage on my car to bugs and wildlife to recipes from magazines to family activities.  Was I ever asked for a photo of the car damage? No - delete.  Do I need to keep portraits of bugs and or little critters? No - delete. Can I actually read the print on that recipe and will I realistically ever make it?  Not clearly and not likely, so no - delete.  As for the family shots, will I share it? If not - well, you know where this is headed….

So what’s my advice?

  1. Shoot fewer! Yes, “film” is free when taking digital shots, but that doesn’t mean taking dozens or even hundreds of shots hoping for that ONE perfect image. Will you have the patience to review them all later, to find that perfect picture? Didn’t think so!

  2. Only save that worth saving.  It doesn’t have to be perfect but it does have to resonate with you.  Be mindful of why you took the picture and the quality of the result.

  3. Rule of thumb - keep 1/3 of original shots and let the rest go. Choose a combination of technically good images as well as ones that evoke the most emotion to edit and keep.  

  4. Delete at source (phone or camera).  By making decisions early, you create less work when you download, tag and edit

  5. Add this task to an existing habit or activity - charging your device, waiting in line or for an appointment or watching television?  Multi task and delete.

Taking lots of photos is fun but keep your digital volume under control - use the delete button to edit, edit, edit!

About the Author:

This blog was written by Kathleen Creighton, a certified photo organizer.  Pictures in Place is a Photo Organzining Company. Please contact info@picturesinplace.ca to discuss your project. 

Why I rename my photo files.

June 19, 2017 Patricia Keogh
BulldogWPIP.jpg

Mention the word “bulldog” to anyone in my family and this image will come to mind before the image of an actual bulldog. This is me at about age one and as you can see I was a chubby baby with lots and lots of rolls! That, coupled with the expression on my face, earned this photo the tag ‘bulldog’.  I don’t have any recollection of this event but this photo is always referred to as the bulldog photo in my family.

That family detail is known in the storytelling but would be lost in digital translation if it weren’t for the renaming techniques I use.  With the ability to take a picture so easily these days we all have lots photos to keep track of. They can become a jumbled mess lost on a hard drive or phone and as time passes it’s easy to forget about specific  pictures. Here are a few simple steps to control and preserve your photographic memories, including naming conventions.

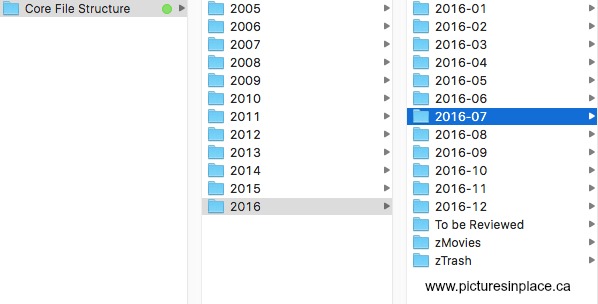
Step One: Keep all of your photos in one place by having a Master Core File Structure to store your images in. Create your file structure with folders by year and then by month as shown here.

Core File StructureWMPIP.jpg

Step Two: Creating file names that are relevant and have meaning makes finding photos easy when they are needed.  Using the When, Who, What, Where method to rename photos embeds meaningful information into your file name. As shown in this examples below, which are copies of the same image.  The first file name provides so much information at a glance whereas I would have to open the second image to find anything out about it.

Step Three: Ensure that your photos are backed up! It is recommended that you have a 3-3-2 back up system - 3 copies of your library, on 3 different devices and in 2 separate locations.

We take photos to capture life’s moments; taking these simple steps ensures that you will can access them easily to enjoy and share!  You want to be able to find your own bulldog in a haystack when you need it!

About the Author:

Trish Keogh is the founder PICTURES IN PLACE, a Photo Organizing Company. Please contact info@picturesinplace.ca  for more information.


TPM_BADGE_MD.jpg

trish@picturesinplace.ca

416.953.5972